2 slip boat dock using AquaMax Marine floats

DIY Floating Dock Plans: 5 Steps to Build It Yourself

Build your own floating dock — weekend-friendly and budget-smart.

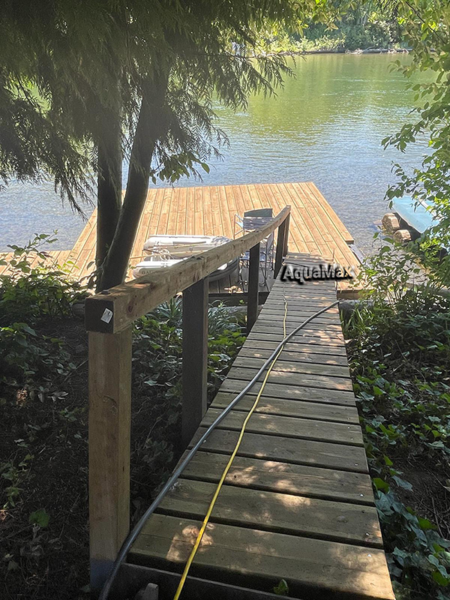
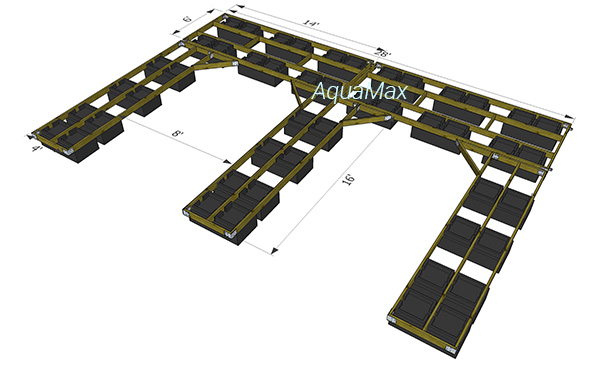
If you’ve dreamed of stepping out onto your own private dock — to fish, swim, or sip coffee in the morning sun — you can make it happen yourself. With the right DIY floating dock plans, quality floats, and a weekend of effort, you can create a safe, sturdy, and beautiful dock for your waterfront property.

This guide walks you through planning, materials, anchoring, and assembly so you can get started with confidence.

Step 1: Plan Your Dock Design

Decide how you’ll use your dock and how it should fit your shoreline.

  • Purpose: Swimming, boating, fishing, relaxing, or entertaining?
  • Size: Popular starter modules are 4’×12’, 4’×16’, and 6’×16’.
  • Shape: Straight run, “T”, “L”, or a modular system you can expand later.
  • Water conditions: Wave activity, current, seasonal depth changes, ice.

Pro tip: Check local regulations and permits before you begin.

20' Gangway leading to a beautiful new floating dock using AquaMax floating dock kits
AquaMax Air-Filled Dock Float

Step 2: Choose the Right Floats

The floats are the foundation of your dock’s buoyancy and stability. This is where quality matters most.

  • AquaMax air-filled polyethylene floats — conservatively rated at 500 lbs buoyancy each.
  • 3/16″ wall thickness for durability and impact resistance.
  • Repairable if damaged (unlike most foam-filled options).
  • UV-protected for decades of service life.

Step 3: Select Your Frame & Decking

Frame options: Pressure-treated or pest-resistant lumber (classic, cost-effective) or aluminum (lightweight, corrosion-resistant).

Decking: Wood for a warm, natural, classic look; composite or aluminum are other options.

AquaMax floats framed in with wood
mooring screw anchors come in three sizes
Mooring Screw Anchors

Step 4: Anchor Your Dock

Anchoring keeps your dock stable and secure in changing conditions.

  • Mooring screw anchors — ideal for lakes and calm bays.
  • Pile brackets & pilings — best for deeper or rougher water.
  • Post & bracket stabilization — great for shallower areas.

Mooring screw anchor diagram showing placement relative to dock corners.  Choose anchoring bsed on depth, current, and local regulations.

Step 5: Assemble & Launch

  1. Construct the frame according to your plan.
  2. Attach floats evenly under the frame to balance load.
  3. Install decking securely with galvanized fasteners.
  4. Add anchoring and test stability in shallow water.
  5. Launch & secure the dock in its final position.

DIYer assembling a floating dock frame with floats attached.  Weekend-friendly build: frame, floats, decking, anchor, launch.


Dock at County Park in Canada using AquaMax floats and anchors

Tools & Materials

  • Cordless drill & bits, circular or chop saw
  • Wrenches & socket set, measuring tape, square
  • Galvanized bolts, nuts, washers
  • AquaMax dock floats & marine hardware kit
  • Decking material (wood or composite)
  • Anchoring system (mooring screws, pilings, or posts)

Finished floating dock with wooden decking on a sunny lake.  Finish strong:  a stable, great-looking dock you built yourself.

Why DIY Your Dock?

                  • Save money on labor
                  • Customize for your shoreline and lifestyle
                  • Learn & maintain confidently over time

Get Started Today

Our AquaMax Floating Dock Kits include floats, hardware, and instructions — you add the decking. We ship tariff-free across the United States and offer lift-gate delivery to your driveway.

FAQ - DIY Floating Dock Plans

Do I need a permit to build a floating dock?

In many areas, yes. Rules vary by state/county and by lake authority. Always check with your local permitting office; some waterways require environmental approval as well.

Capacity depends on float count and spacing. AquaMax air-filled floats are conservatively rated at 500 lbs of buoyancy each, which you can use to calculate safe load for your layout.

Air-filled (AquaMax) are repairable, feature 3/16″ thick walls, and are UV-protected. Foam-filled options are typically not repairable and can absorb water over time, reducing buoyancy.

Common modules are 4’×12’, 4’×16’, and 6’×16’. Choose based on intended use, shoreline space, and water depth. Modular builds let you expand later.

Pick based on conditions: mooring screw anchors (calm lakes/bays), pile brackets & pilings (deeper/rougher water), or post & bracket stabilization (shallow areas).

With quality materials and proper maintenance, expect 20+ years. Heavy-duty, UV-protected floats and galvanized marine hardware extend service life.

Yes. Most DIYers assemble a dock in a weekend with standard tools. AquaMax kits include floats, hardware, and instructions — you provide the decking.